
You’ve seen diagrams with connectors – arrows or lines that connect shapes in flow charts, mind maps, organization charts, and more. Almost every diagram uses connectors – these connections indicate relationships between the shapes in a diagram.
The most simple (and suboptimal) way is to draw a line between the two shapes. But if it is a simple line and not a connector, whenever you move one of the shapes, you’ll have to manually move the line.
Adding connectors
Using a connector instead of just a separate line will save you a lot of time and effort: When you move a shape the connector moves with them.
There are several ways to draw and attach connectors in draw.io.
Method 1: Start and end on connection points
Make sure the shape you start from is not selected. Hover over the shape, then click and drag a connection from one of these blue crosses (connection points) to the shape you want to connect to. Release the mouse button when you see a green circle on the target connection point – otherwise the connector will not be linked to that target shape.
Method 2: Start from one of the blue arrows
When you hover over a shape, you can draw a connector from one of the four blue arrows in the same way as method 1.
Method 3: Use the symbol library
You can insert a connector from the symbol library, and drag each end to a connection point of a shape.
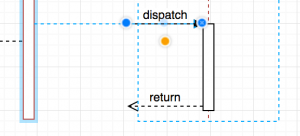
Floating and fixed connection points
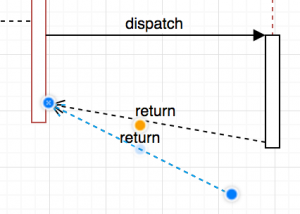
Sometimes you don’t want to connect to any particular connection point, but to the edge of a shape. And perhaps you want one end of a connector to move (float along the shape’s edge) and the other to stay in one position. There are two types of connections, indicated with blue and green frames in draw.io.
Create a floating connection
Drag the end of your connector over a shape until you see a blue frame appear on your target shape. In the example below, the top connector has been dragged to the shape on the left – you can see the blue frame around it.
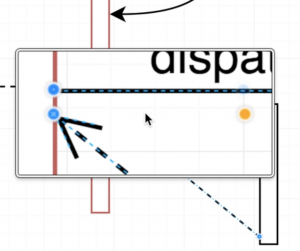
Create a fixed connection
Drag the end of your connector over the shape and wait for about 3 seconds, or move further onto the shape until the frame turns green. Alternatively, you can press the Alt key before connecting to the shape, to make sure the frame is green and you create a fixed connection.
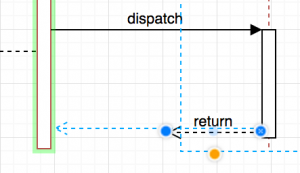
Now when you move the shape on the right down a little, you’ll see the top connector ‘slides’ or ‘floats’ along the edge of the left hand shape, and the bottom connector remains in a fixed position.
Need to clone a connector?
Do you want to clone a connector, and keep one end attached? Easy!
Select the connector, hold the Ctrl key, then select the end of the connector that you want to place elsewhere, and release the mouse button. Your connector will be duplicated, including its style and label.
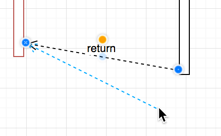
Not sure what type of connection is currently used?
When you select a connection, you can see two blue end-point circles. A ‘.‘ inside this circle indicates a floating connection, and an ‘X‘ means it is a fixed connection.
Watch the video below to see more clearly how to create fixed and floating connections. You are also welcome to experiment with connectors in our example diagram.
You are currently viewing a placeholder content from Youtube. To access the actual content, click the button below. Please note that doing so will share data with third-party providers.
Just getting started?
Download our beginner cheat sheets to keep draw.io keyboard shortcuts on hand while you are diagramming.
Step through our getting started guide for draw.io to learn more about working with connectors and shapes, or have a look at our extensive user documentation.
Last Updated on April 17, 2020 by Admin