
Diagramming is one of the most popular type of add-on for Confluence. It’s easy to see why: so many departments, project, and working groups need to create and publish diagrams, and they want to keep the diagrams with their related text. Diagrams help people understand complex information faster.
So, your company has installed draw.io for Confluence, and now you want to learn how to use it. Fantastic!
If you follow these tips and watch the videos, you’ll be up and running with draw.io for Confluence in no time flat.
Step 1 – Create a new diagram
A draw.io diagram is inserted like any other macro in a Confluence page.
Create a new page in Confluence, or edit a page that you have permission to edit.
Click somewhere within the page, then click the drop down menu in the toolbar with the plus icon (“+“), and select “draw.io diagram“. If you don’t immediately see “draw.io diagram” in the list of macros, search for it – enter “draw” in the search field at the top of this dialog.
Tip: You can use the curly bracket keyboard shortcut – in the Confluence page, type {draw then press Enter.
You’ll see the template manager. Creating a new diagram is fast and easy when you choose a template that is similar to the type of diagram you want to create.
Select a blank diagram, then click Select, or choose a template or an existing diagram and click Copy.
Tip: Search for a template to find it faster – use the search option on the left of the dialog and input your search term to display a list.
You are currently viewing a placeholder content from Youtube. To access the actual content, click the button below. Please note that doing so will share data with third-party providers.
More InformationStep 2: Get to know the draw.io interface
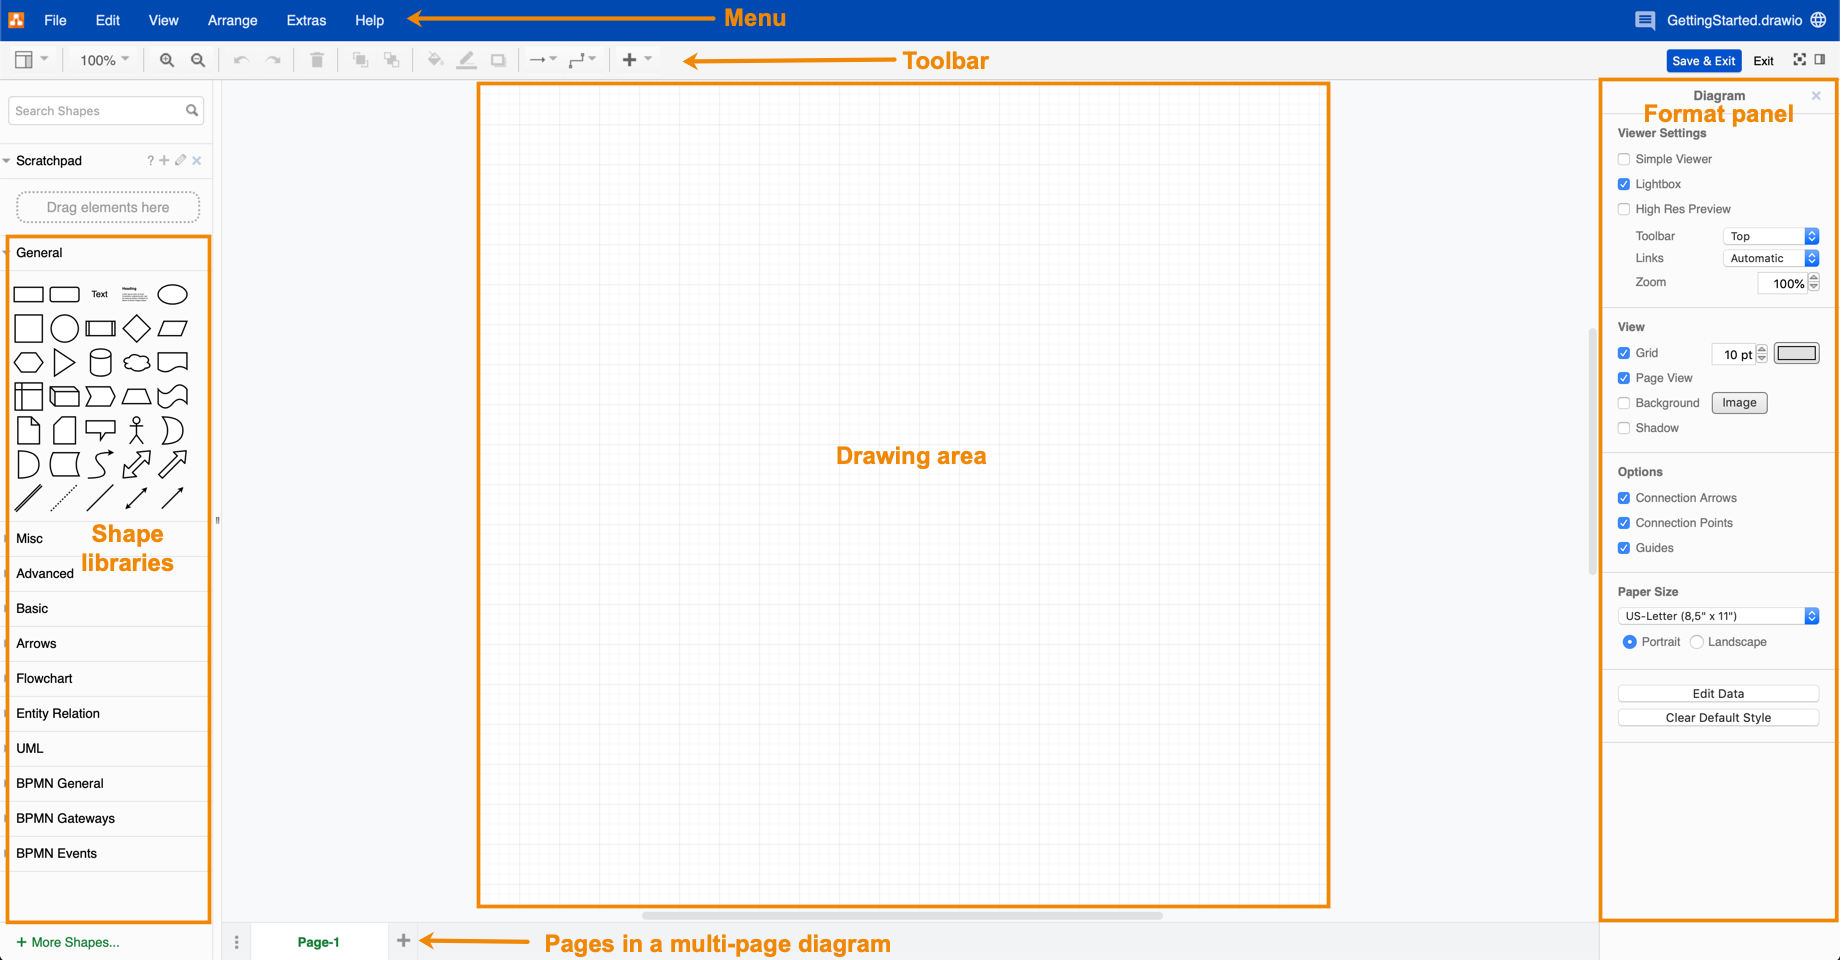
A diagram typically consists of shapes, connectors, and text. Depending on what you work with, the available tools in the toolbar and the displayed formatting options will change depending on what you have selected.
Toolbar
The toolbar is displayed directly under the draw.io menu. The available tools will change depending on what you are working with in your diagram.
Drawing area
The drawing area is in the middle – what you see in this area is what is displayed in your Confluence page after you save it. There are guide lines to help you align each component in your diagram.
You can move around the drawing area with the mouse wheel or the scroll bars on the sides of the drawing area. Or you can click and hold the right mouse button and drag the drawing area around.
To zoom in and out, use the two magnifying glass icons in the toolbar. Alternatively, press and hold the Alt key and use the mouse wheel to zoom.
An introduction to the draw.io interface
Shape library
The shape library is displayed on the left hand side of the drawing area and contains a variety of shapes, connectors, and text organized into categories. You can expand or collapse these categories as needed.
To add a shape to your diagram, simply click on a shape in the symbol library, or click and drag it into the diagram.
Shapes, text, and connectors in the drawing area are collectively called objects.
Tip: You can add your own shapes to a custom library, if you can’t find the ones you need.
Format panel
When you select an object, you can customize how it appears, text included within the shape, or the arrangement and size in the format panel on the right hand side of the drawing area.
When nothing is selected, the drawing area itself may be customized.
The contents of the format panel change depending on what you have selected.
Step 3: Add shapes to your diagram
Shapes can be added to a diagram and connected to each other in many ways. The shapes you choose will be based on the type of diagram you want to create.
Click on a shape in the symbol library (left hand panel) to insert it into your diagram. You can then move it around on the drawing area – click on the shape in the drawing area and hold the mouse button down, then drag it to the position you want it to be.
Alternatively, you can drag a shape from the shape library into position on the drawing area.
Moving groups of shapes
To move a group of objects (shapes, connectors, and text), you need to select them with a frame. Make sure you start your selection by clicking in an empty space on the drawing area, and the frame that you drag from that point completely surrounds the objects you want to select. You can then move your selection as a group.
Alternatively, you can select multiple objects by holding Shift and clicking on them.
You are currently viewing a placeholder content from Youtube. To access the actual content, click the button below. Please note that doing so will share data with third-party providers.
More InformationChange the format of a shape, connector, and text
Click on an object to select it, and you’ll see the options in the format panel on the right hand side change to display three tabs, Style, Text and Arrange. The options are different for shapes, text and connectors.
- Style – Change the color, line thickness, fill, or style of your object.
- To change the font, justification, alignment, and font color of a text object, or the text included within a shape or connector – use the options in the Text tab.
- To change the size, position, and angle of shapes and text, and the position of any layered object – use the options in the Arrange tab.
Tip: You can also change some of the formatting with several tools in the toolbar.
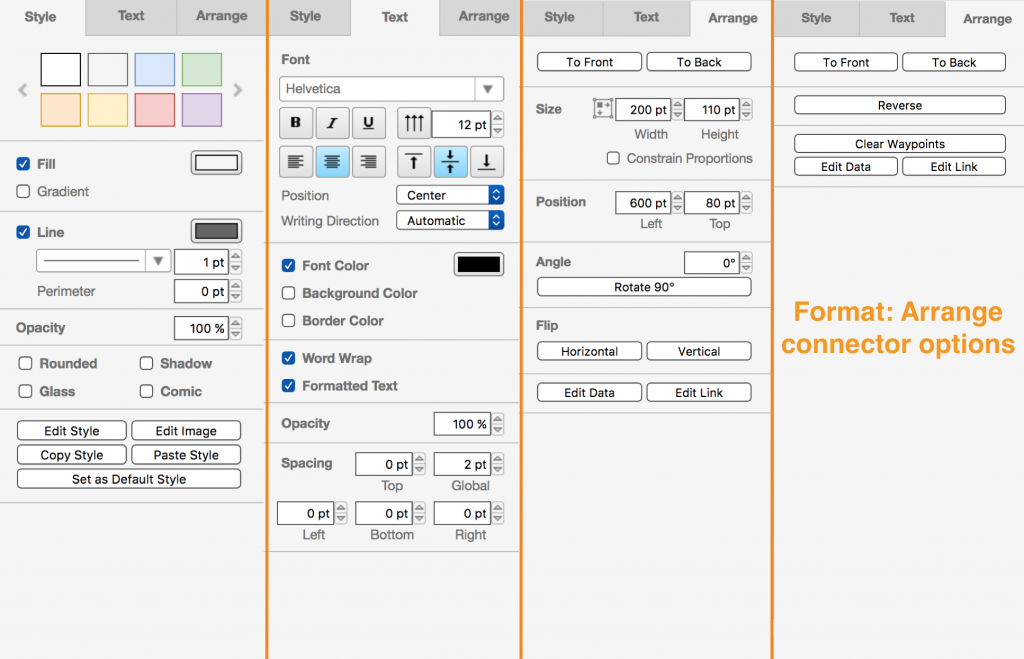
draw.io – tabs on the format panel
Replacing a shape with a different shape
Simply drag a shape from the symbol library over the shape you want to replace, until the replace icon is displayed. Release the new shape on the replace icon (it will change from gray to black – you want to release the shape when the icon is black).
You are currently viewing a placeholder content from Youtube. To access the actual content, click the button below. Please note that doing so will share data with third-party providers.
More InformationDuplicating shapes quickly and easily
You can easily duplicate shapes that are in the drawing area. And there are many ways to do this.
Select an object, and click Edit > Copy then Edit > Paste in the menu, or Edit > Duplicate. You can also use the keyboard shortcuts Ctrl+C then Ctrl+V.
You can select multiple shapes, connectors and text and duplicate them as a group.
After you have duplicated your objects, you can move them into position.
You can simply hover over a shape and you will see four blue arrows, one in each direction. Click on one of these arrows to duplicate your shape in the direction you chose. It will be automatically connected to the original shape, and the new shape will be selected. We’ll cover connectors in more detail in Step 4.
Tip: There are several more ways to duplicate and connect shapes in draw.io.
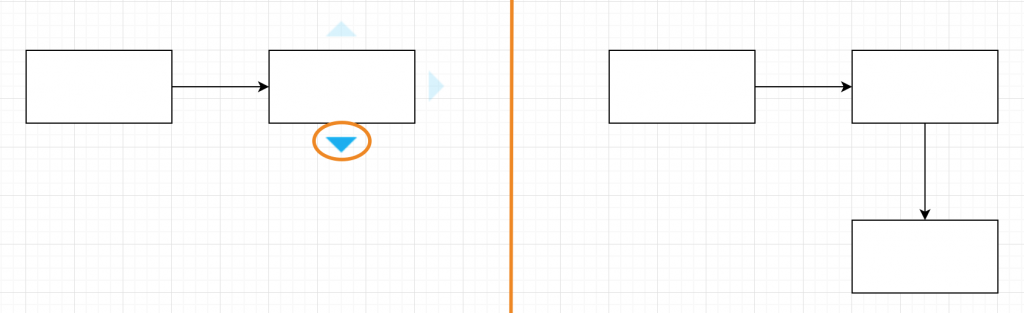
draw.io – duplicate shape with an automatic connector
Scaling and rotating
Select a shape or text and you will see 8 blue points. Click and drag any of these points to resize your shape. Hold down shift as you resize your shape to keep the same proportions as the original shape.
A black rotate symbol is displayed above a selected shape or text. Click on this and drag to rotate your shape around its central point.
You are currently viewing a placeholder content from Youtube. To access the actual content, click the button below. Please note that doing so will share data with third-party providers.
More InformationAdding text inside shapes
Instead of adding a separate text field that will not move with your shape, you should add the text directly to the shape.
Select a shape and simply start typing your text.
By default, the text will be in the middle of the shape and will wrap automatically at blank spaces to the edge of your shape.
You can change the formatting of this text by using the options in the Text tab of the format panel while this shape is selected.
Of course, you can also add text to connectors, but more on that in the next section.

Step 4: Working with connectors
Most diagrams aren’t simply a collection of shapes, you want to indicate those relationships with connectors. These are lines and arrows joining shapes and text objects together.
You don’t need to draw separate lines and arrows to connect shapes – in fact, this is not recommended, because the lines won’t move with a shape, whereas a connector will.
Using connectors will save you a lot of time and effort!
As in Step 3, if you want to duplicate a shape and automatically connect it to its copy, hover over a shape until the blue arrows appear, and click on the direction in which you want the duplicate to appear. By default, these shapes will be connected with an arrow.
Connecting shapes
To draw a connection between unconnected shapes, make sure the shape you start from is not selected. Hover over the shape with the mouse and you will see small blue crosses. Click and drag a connection from one of these blue crosses to the shape you want to connect to (it will also have blue crosses). Make sure you release when there is a green circle on the connection point you want to use – otherwise the connector will not be linked to that shape.
You can also draw a connector in the same way, but starting from one of the blue arrows that appears when you hover over a shape.
You are currently viewing a placeholder content from Youtube. To access the actual content, click the button below. Please note that doing so will share data with third-party providers.
More InformationConnectors from the shape library
You can also add connectors from the shape library. Click on the connector shape you want to use and then move it into position. Be careful to move each end onto a connection point on a shape when it displays the green circle – otherwise they will not be linked.
Adding waypoints and changing the shape of connectors
Sometimes, you want to make a connector go around other objects in your diagram. You can do this by adding and moving waypoints on your connector.
Select a connector, and you will see a light blue point – click on this and drag it to add a new waypoint to the connector. A new potential waypoint will be shown with that light blue point between existing waypoints (dark blue points). You can do this any number of times to change the path that your connector takes.
You can click and drag any existing waypoint to move it.
You can also add extra waypoints to connectors and change its shape using the Waypoints drop down list on the toolbar.
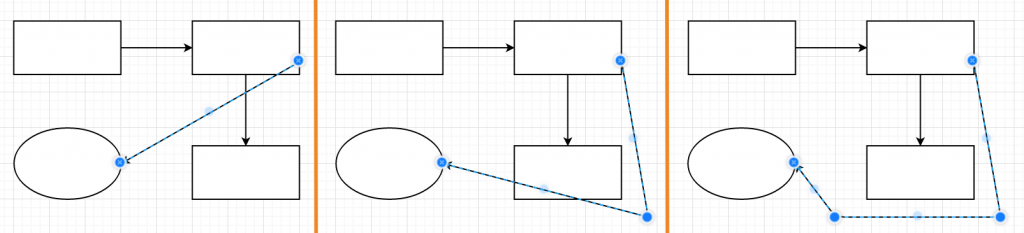
draw.io – adding waypoints and re-shaping connectors
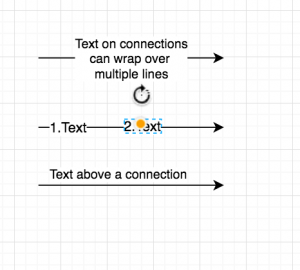
Adding labels to connectors
It’s common to add labels to connectors, especially if you are creating a diagram as part of the software development process.
To add a label to a connector, double click on or near it, and a text field will appear – enter your text.
To move a label, click and drag it to another position on the connector. You can add more than one label to each connector.
Note: Text labels above, below or next to connections may not be correctly positioned when you move a shape. Simply move the label back into place if this occurs.
Change the format of a connector
You can change the formatting of the connector and the text label by clicking on it and then using the options in the Style and Text tabs in the format panel.
Select a label and rotate it by clicking on the black rotate symbol and dragging it into position.
Tip: You can also change the style of a connector using Connection drop down list on the toolbar.
Step 5: Saving and viewing your diagram in Confluence
Now that you have created your diagram, you will want to save it. Simply click the Save and Exit button at the top right in the toolbar, and you’ll return to the Confluence page. You will see a preview of your diagram. Save the Confluence page.
When you select the macro preview while in the edit mode on your Confluence page, you have a number of options.
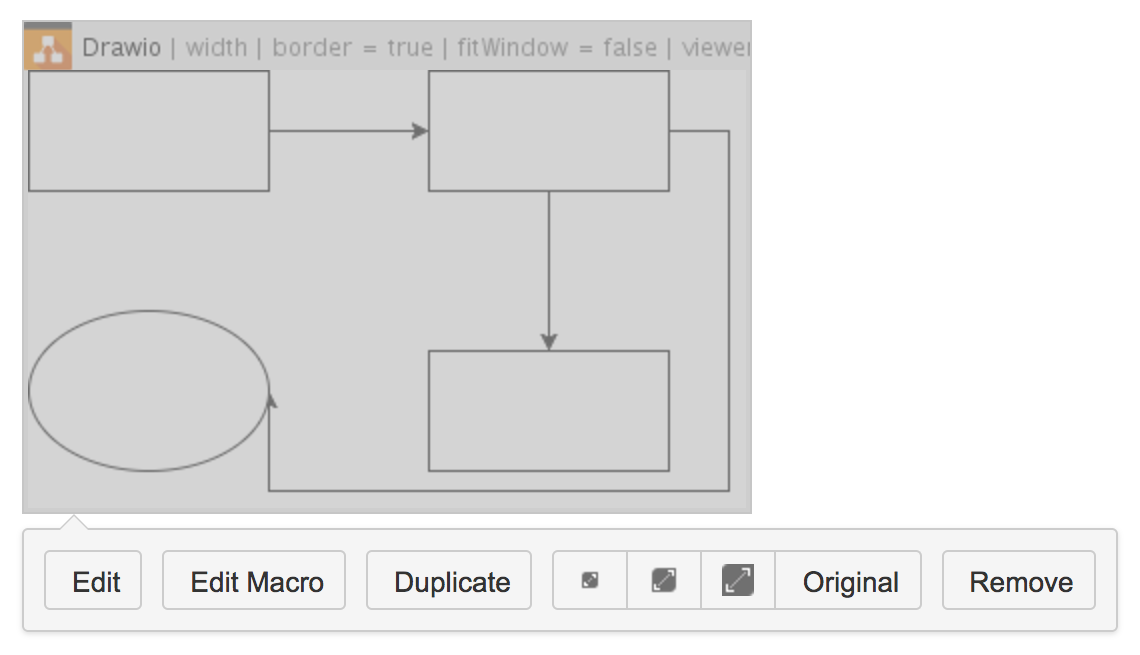
- Edit: Open the diagram in editing mode.
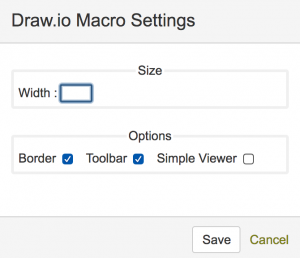
- Edit Macro: Change the displayed size of a diagram, choose whether it has a border or not, and if a toolbar is displayed.
- Duplicate: Create a copy of the diagram within the page. You will be prompted to enter a new name for the duplicate.
- Change the displayed size of the diagram in the same way as you alter displayed images.
- Remove: Delete the diagram.
Restore a ‘lost’ diagram? Sure!
If you mistakenly click Exit, don’t worry – your diagram has not been lost. draw.io automatically saves the state of your diagram. Simply insert a new diagram, and you will see the diagram you had previously worked on in the Recent Diagrams list.
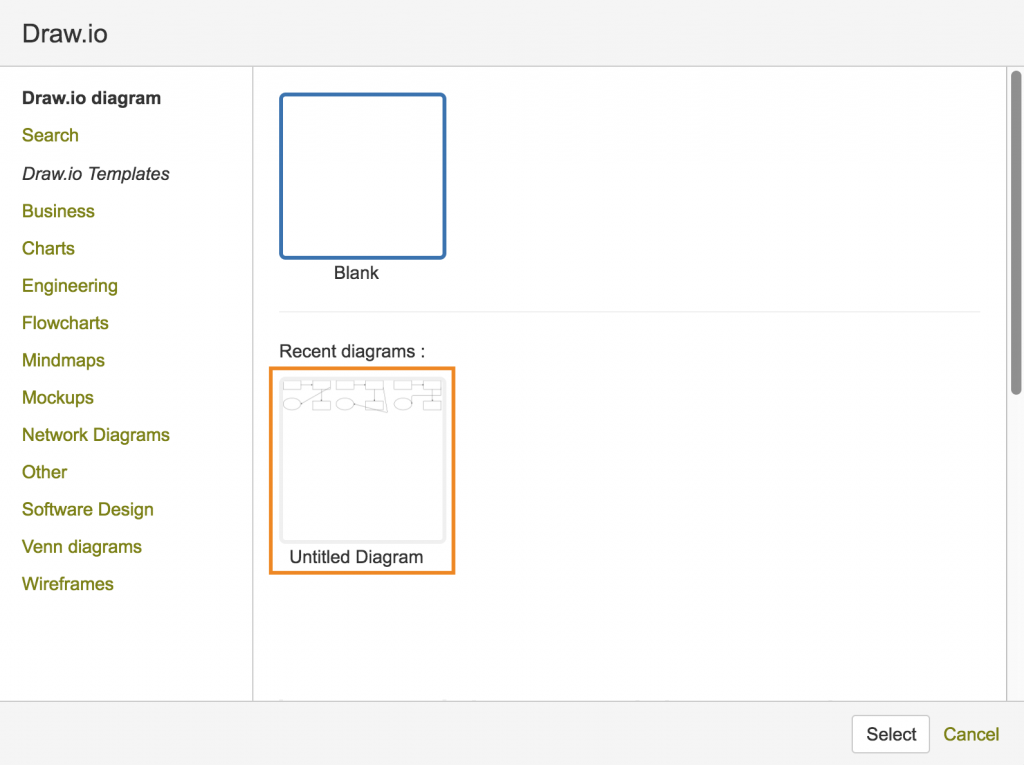
draw.io – insert an unsaved diagram
draw.io and Confluence’s revision history
Changes to draw.io diagrams are directly saved in Confluence in the page history, with the date and time of the change, as well as name of the user who made the change.
You can restore older versions of a diagram from this page history.
You are currently viewing a placeholder content from Youtube. To access the actual content, click the button below. Please note that doing so will share data with third-party providers.
More InformationImporting and exporting diagrams
There are many import and export options available in draw.io.
You can import diagrams in the following formats: XML (draw.io), Gliffy, and VSDX . Click File > Import then select the file you want to import.
There is also a mass import function for Gliffy diagrams – you can convert all of the Gliffy diagrams within your Confluence intranet to draw.io with just a few clicks.
Exported diagrams can be saved in the following formats: PNG, JPEG, PDF, SVG, and XML. Click File > Export to see the options available for each file format.
draw.io diagrams in view mode
What do you actually see when you have saved your diagram and saved your page? Your diagram in your page of course!
When a viewer hovers over your diagram, a small toolbar is displayed by default, where they can change the size of the displayed diagram, or view it ‘full screen’, just like any other image in Confluence.
You can turn this toolbar off in edit mode: Click on the draw.io macro to display the options toolbar, then Edit Macro. Deselect the Toolbar checkbox, and save your page.
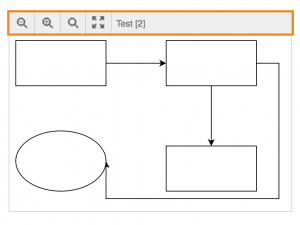
draw.io – diagram in Confluence’s view mode with the toolbar
Ready to learn more?
You have learned all the basics for using draw.io!
Keep our beginner cheat sheets for draw.io at your side, and I promise you will get comfortable with draw.io in no time.
Our user documentation for draw.io for Confluence contains additional videos and screenshots that may be helpful.
Watch this blog for posts that explain how to use the more advanced features of draw.io, and level up your diagramming skills.
Last Updated on August 1, 2023 by Admin